Many of you have probably seen my website, but never really had the chance to take a detailed look at Project Twin. Well, after James E-mailed me about doing a feature to coincide with the Twin being in R/C Nitro, I figured what better chance? I've received e-mails asking about various things. Questions as general as "How'd you do it?" to "Where'd you find that diamond plate?" So hopefully I can answer the bulk of the questions some of you guys may have.
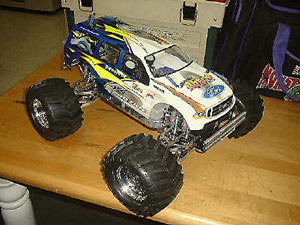
First off, let me tell you how it all came to be. I was working at a LHS in Augusta, Georgia and was having a tough time deciding whether to get a HPI Nitro MT or the Traxxas T-Maxx, since they were both hitting the market at about the same time. I bought the NMT and ran it for every bit of 15 minutes before it twisted 3 out of 4 dog bones. So after suffering the initial headaches of the NMT, and having it sit while HPI scurried to send out the improved version, a kid came in one Sunday for free racing. He brought his new T-Maxx with him. Out in the parking lot he had a few start-up problems. After a couple of minutes, I had him up and running. After taking a couple of laps with the big truck, I started getting hooked, big time! The T-Maxx was WAY more fun than the NMT to drive and had no problems keeping up with (or driving over) the Touring Cars on our tight track.
After that initial drive, I walked back inside and bought one. I also picked up an O.S. .15 CV-X Hyper. The poor TRX .15 never saw the light of day. I ran the Hyper in the T for about 2 or 3 weeks and a buddy that came into the shop all the time showed me an article by Greg Vogel, where he built a Twin-engined USA-1. With the NMT and T-Maxx being my two choices, and the NMT hardly being able to keep itself together, I opted to sacrifice the T-Maxx, much the way I'd torn apart almost everything my parents bought me as a kids, but maybe I would get this one back together!
Well, first thing to do was to strip everything but the transmission and steering/reversing servos off the chassis. This gave me a completely open chassis to work with. Deciding where to put the second engine was an easy task, where the stock fuel tank sat. I had cracked the tank and bent the primer already, so to the trash can it went. I had a few engines lying around in pretty bad shape, one of which had a broken case. Since the crankshaft and all was in good shape, I cut the crank, mounted a Traxxas flywheel/clutchbell and bolted the busted up engine with pull-starter on some HPI heat sink engine mounts.
This allowed me to find out exactly where the second engine would have to be. I tried to place it so that the spur and clutchbell met up with the tranny sitting in it's stock location, but that meant that the pull-starter hung off the end of the chassis and the left rear suspension arm would smack the pull-starter under compression. So I loosened the tranny and slid it down the chassis until the engine's pull-starter cleared the suspension arm. So with the tranny in place on the chassis, and the engine bolted to the engine mounts, I marked the location of the engine mounts with the backside of a #11 hobby knife and then unbolted the engine from the mounts. Then I C-clamped the mounts to the chassis, right inside the lines I had traced with the knife blade. After that, I used a 3mm drill bit and drilled the centers of the holes for engine mounts. After all the centers were drilled, I opened up the holes to allow the engine to be moved to allow me to set gear mesh depending on the size clutchbell used.
After the second engine was in place, I did the same for the engine that's in the stock location.
Now< that both engines are in place, it's time for exhaust. I had been trying to call MIP to get an expected date on the Stinger kit for the T-Maxx, but they didn't have them ready to sale when I built the truck. Instead, I flipped a couple of stock headers and attached MIP Stinger pipes. The header on the left engine need to be bent just a bit to clear the engine on the right, but no big deal. A couple of pieces of bent piano wire with fuel tubing around them secure the Stingers to the rear shock tower so they don't flop around and come off. I also cut a section of fuel tubing and extended the pull-start on the right engine. That made both pull-start handles accessible from the same side of the chassis.
Not too bad, but a couple of new problems were created.
The first problem is fact that the rear drive shaft is too short. The easy fix to this is to buy a pack of Traxxas axles for the T-Maxx (Part #TRA4951). The inner axle shaft had to be trimmed a bit, but no big deal. (I believe this is the same thing included in the Hardcore Racing .21 conversion kit)
The second problem is that the front drive shaft is too long. This was easy fix; I just trimmed the two halves until they lapped over each other with the tranny in place on the chassis.
One other thing I had to do is Dremel the chassis a bit so that the brake disc clears. Since I ran dual disc brakes, this meant a good bit of Dremel work. Again, no big deal.
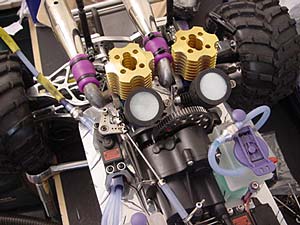
With the engines in place and exhaust mounted up, it was time to figure out the rest of the chassis layout. I still needed to add a couple of fuel tanks, the receiver and battery, not to mention figuring out placement of the throttle/brake servo and linkages.
The obvious next step was to figure out throttle servo placement and linkage. I looked at Greg's USA-1 and saw how he built a U-shaped linkage to connect two slide carb engines. The only bad thing in that was that a new linkage had to be made each time you changed gear ratio. I figured out that if I used the stock Traxxas carb arms, I could slide piano wire straight through them and place collars and grub screws on each side to make the carbs move as one. So with the linkage between the carbs figured out, I found there was only one place to put the servo, without making a mess of the chassis with bellcranks. I decided to place the throttle servo just over the location on the stock chassis where the cutout was for the stinger on the stock pipe. With the stock header flipped, the linkage cleared just fine! I bought some heavy-duty Du-bro servo arms in the airplane section of the LHS and tried them out. I needed a longer servo arm, but a heavy duty one couldn't hurt! I used a bunch of odd and end parts to build the linkage and get the servo to travel so that nothing in the linkage binded. After that, I had to make the brake linkage, make sure the servo traveled far enough to engage the brake, and then check the travel on the carbs. It took quite a while going back and forth between the two to get everything right.
Now for fuel tanks, RX pack, and the receiver.
The receiver, from the start, has been mounted on the backside of the front shock tower. I did this for two reasons. One is to clean up the chassis, and make it more open and easier to clean, and the other is so that it's up nice and high, away from any nitro that might get spilled.
During the course of the build-up, I kept thinking about what it was going to be like to drive this thing. I wanted to behave predictably in the air, so I tried the best I could to balance it at about the center of the transmission. For this reason, I moved the battery pack as far forward as possible, to the top of the front bulkheads, Justin front of the shock tower. Since the shock tower was aluminum, and I knew vibration would be an issue, I placed a small piece of foam between the RX pack and the tower to keep the battery from shorting out.

That left the two fuel tanks. I had been using CEN fuel tanks on my Touring Cars for a good while, and decided to keep'm for use on the Twin. The only change made to these tanks was to remove the primer and plug the hole with a screw, a couple of O-rings and a nut. I placed the one on the passenger's side just forward of the throttle servo, to help shift weight forward a bit. The other tank went just forward of the engine on the driver's side, in the little space between the steering servo and the clutchbell.
That was it, add fuel line and filters and start it up. Each engine was broken in separately, and idle was set on each. Then came time for the moment of truth. Firing them both up at the same time. Everyone asks how both engines power one spur without tearing up the spur. Some even ask, "How did you get the engine to turn in the opposite direction?" Both engines turn the same direction. Think of looking at a clock with a second hand. At 4 o'clock (where the stock engine is) the second hand is moving down. At 7 o'clock (second engine) the second hand is moving up. Now, imagine that second hand is a spur gear. It's rotating clockwise, while both engines are rotating counter clockwise. (It's actually backwards, R/C engines rotate clockwise and spur goes counter-clockwise, but this helps explain the "How")
So to start, you pull one engine, get it running, let it idle, and move to the other. The rpms pick up once both engines are running, since they're working together. They're sharing the load that's placed on them, so the throttle response, and torque, are greatly improved.
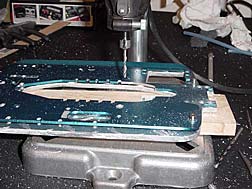
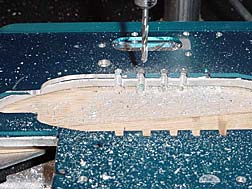
The hardest part of the whole truck was making that chassis. My step-dad had given me a couple of sheets of aluminum for my old Willys to make a dash out of. I sold the Willys and had the aluminum in the garage. I was out one day looking for a drill bit and happened to see the aluminum laying in the corner, covered in dust. 14 hours later I had a new, more durable, chassis.
It was a lot of fun building this truck, and I'd like to thank a bunch of people for helping out:
Bill at RC Alloys for making the custom wheels
Jason at RixGear for the lower chassis braces
Kevin at Torn Creations for the two identical custom bodies
Robin AKA MonsterMaxx at Unlimited Engineering for the Supermaxx susupension
The guys at Progressive Suspension for the piggybacks |